ECS201A Experimental Setup
Sources:
- ECS201A Homepage
- ECS201A Projects(gem5)
All the experiments rely on the same python env and a software called gem5.
The professor has offered us github codespaces, such as classroom assignment-0, to develop,upon which you don't need to worry about the setup. So it's strongly recommended to develop with github codespaces.
However, if you prefer to develop on your local machine, to set up for the experiments you must:
- Install and config gem5 on your system.
- Clone the assignment repo and config it.
Steps
Install gem5
--> Building gem5 on Ubuntu
It's highly recommended to use Ubuntu20.04 or 22.04.
Install all dependencies (For Ubuntu 20.04):
1
2
3
sudo apt install build-essential git m4 scons zlib1g zlib1g-dev \
libprotobuf-dev protobuf-compiler libprotoc-dev libgoogle-perftools-dev \
python3-dev python-is-python3 libboost-all-dev pkg-configGetting the code:
1
2
git clone https://github.com/gem5/gem5
cd gemMake sure your system python version is larger than 3.6. In the root of the gem5 directory, run:
1
scons build/{ISA}/gem5.{variant} -j {cpus}
For instance, if your target ISA is
X86and you want to leverage your 4-core CPU to compile, the command is:1
scons build/X86/gem5.opt -j 4
If the target ISA is
RISCV, then the command isscons build/RISCV/gem5.opt -j 4.Wait for a long time until the compilation ends.
Note: you must use your system's python interpreter instead of conda. (-->Source). If not, you'll have a linking error looks like:
1
2
3
4
5
6
7
8
9
10
11
$ scons build/X86/gem5.opt -j 4
scons: Reading SConscript files ...
Mkdir("/home/lykuni_ucdavis_edu/gem5/build/X86/gem5.build")
Checking for linker -Wl,--as-needed support... yes
Checking for compiler -gz support... yes
Checking for linker -gz support... yes
Info: Using Python config: python3-config
Checking for C header file Python.h... yes
build/X86/gem5.build/scons_config/conftest_5: error while loading shared libraries: libpython3.9.so.1.0: cannot open shared object file: No such file or directory
Checking Python version... no
Error: Can't find a working Python installationNow you can call gem5 with:
<path of gym5 repo>/build/{ISA}/gem5.{variant}. For convience, you can add gem5 to your systemsPATH:1
2
3
4
5
6
7# In your `~/.zshrc` or `~/.bashrc`
# Path to built gem5:
# Syntax: "<path to gym>/build/{ISA}/gem5.{variant}". Note: Change the path according your need. E.g., for RISCV ISA as your target, the command is
# "$GEM5_HOME/build/RISCV/gem5.opt"
export GEM5_HOME="$HOME/gem5"
alias gem5="$GEM5_HOME/build/X86/gem5.opt"
Config your project
Clone your project together with the submodule
gem5. Take my assignment0 project as example:1
2git clone --recurse-submodules [email protected]:ECS201A-WQ24/ecs201a-assignment0-LYK-love.git
cd ecs201a-assignment0-LYK-love- The
--recurse-submodulesis to clone the gem5 repo as a submodule. Otherwise you'll get a blankgem5dir under the project root.
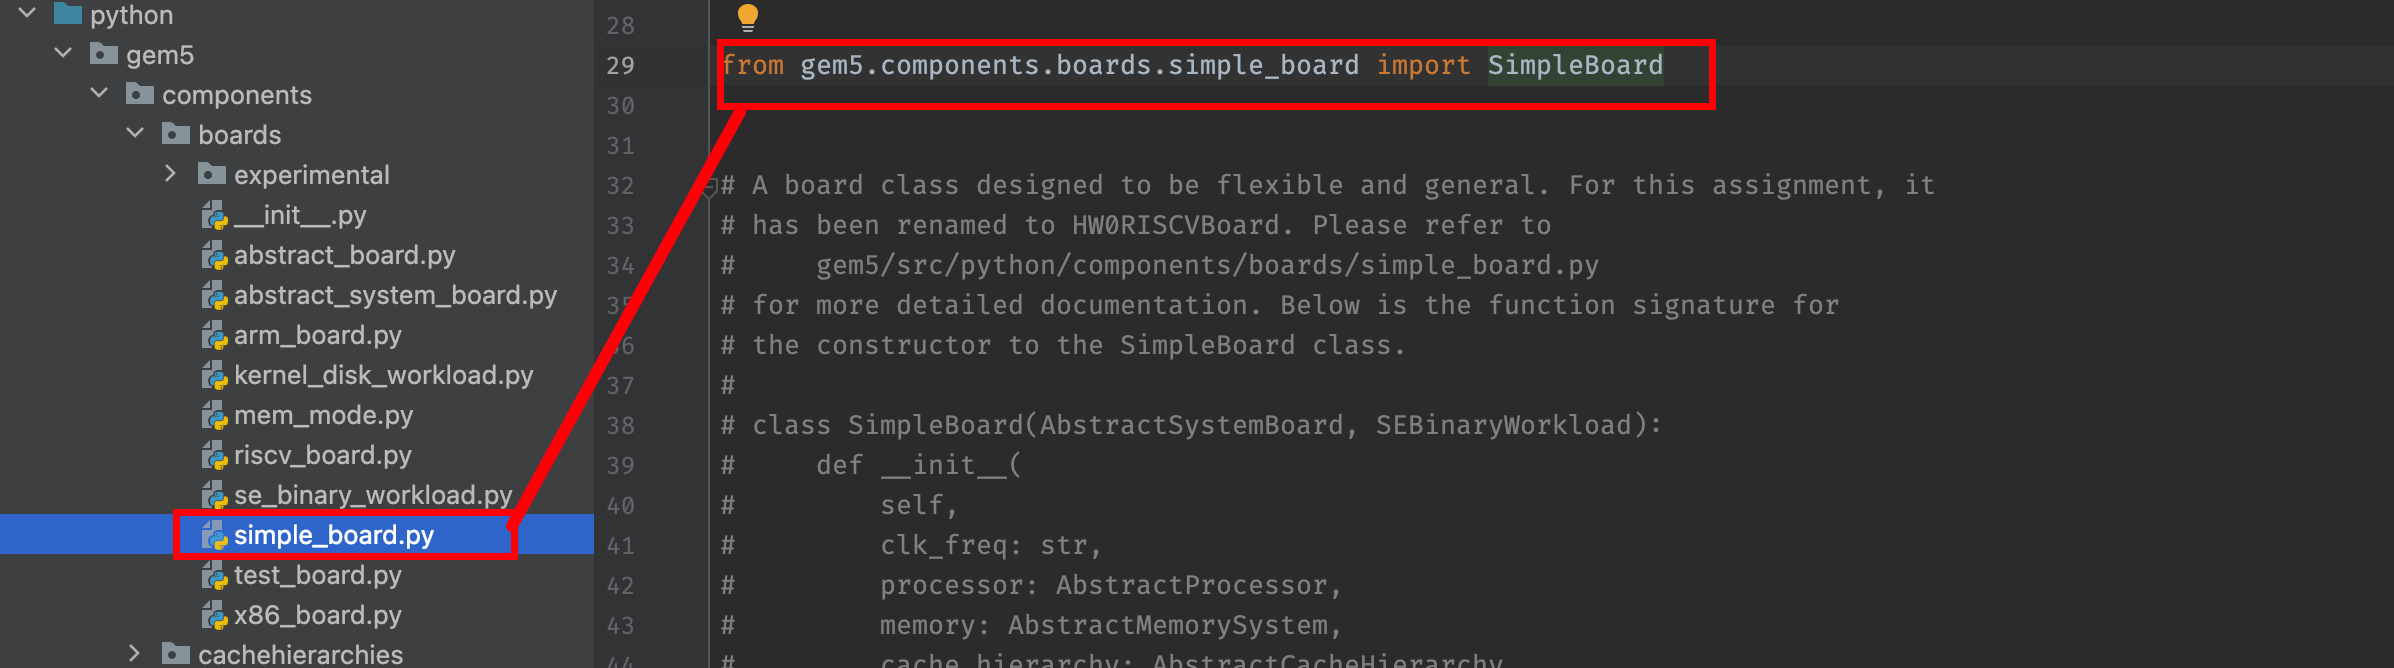
One problem is that in the code, many scripts rely on
gem5python package, whereas this package- The
Install all dependencies:
1
pip install -r requirements.txt
One problem is that, in the code, many scripts rely on
gem5python package, e.g., incomponents/boards.py:1
from gem5.simulate.simulator import Simulator
whereas this package lies in
<project>/gem5/src/python. In order to let PyCharm be able to search (and import) this package, we must mark<project>/gem5/src/pythonas "Source Root":![ECS201A Figure_1]()
After that, all the imports of gem package is successful:
![ECS201A Figure_2]()

In detail
The building command of gem5 is
1 | scons build/{ISA}/gem5.{variant} -j {cpus} |
where {ISA} is the target (guest) Instruction Set Architecture, and {variant} specifies the compilation settings. For most intents and purposes opt is a good target for compilation. The -j flag is optional and allows for parallelization of compilation with {cpus} specifying the number of threads. A single-threaded compilation from scratch can take up to 2 hours on some systems. We therefore strongly advise allocating more threads if possible.
Commands
By default gem5 outputs to standard out stdout and standard error stderr . To dump these info to a file, you can:
1 | gem5 -r run.py |
This is what you will see in your terminal after running the command above.
1 | Redirecting stdout and stderr to m5out/simout |
Now, if you look at m5out, you will see that there is a new file name simout. Let’s print the content of that file and compare to our previous output in Invoking gem5. To do that, run the following command in your terminal.
You separate stdout and stderr into two files.
1 | gem5 -re run.py |
After running the command above, this is what you will see in your terminal.
1 | Redirecting stdout to m5out/simout |
Redirecting output: --outdir=<outpout_folder>
Appendix
- Syllabus
- Past lecture videos