How to Create a Bootable USB Stick
How to create the installation media, which is used to install Linux on your machine, with corresponding tools.
"To install Ubuntu Desktop(or other Linux distros), you need to write your downloaded ISO to a USB stick to create the installation media. This is not the same as copying the ISO, and requires some bespoke software."
安装操作系统的第一步是制作该操作系统的系统盘, 这需要专门的系统盘制作工具. 你需要首先下载你想要的Linux发行版的镜像(ISO文件), 然后使用对应的工具将image写入存储介质(也就是所谓的installation media)中, 一般选择U盘. 这样的存储介质就是系统盘.
Ref: Create a Bootable USB stick in Ubuntu
Intro
You can use different tools to create your USB stick:
- Windows: Rufus
- Mac OS: Etcher
- Ubuntu: Startup Disk Creator
- Linux, Windows and Mac OS: balenaEtcher
此外, 额外介绍下Ventory, 这是个中文的系统盘制作软件, 支持Windows和Linux, 它有个很大的优点就是可以在同一个USB stick内安装多个ISO, 而Rufus, balenaEtcher只能装一个. 它的缺点是UI是中文的, 并且十分粗糙丑陋.
Note: Checksum
Note: 为了确保自己安装的image没有损坏, 你可以对image进行checksum. balenaEtcher在制作系统盘时会自动计算checksum, Ventory制作的系统盘在用于启动后, 也会提供一个计算checksum的选项.
你也可以自己计算image的checksum, 方法在你选择的发行版会给出.
CLI
最简单的方法是用dd命令将镜像文件直接写入USB, 不需要安装额外软件.
以OSX为例:
找出USB 挂载的路径:
diskutil list:1
2
3
4
5
6
7
8
9
10
11
12
13
14
15
16
17
18
19
20
21
22
23
24
25~ ❯ diskutil list
/dev/disk0 (internal, physical):
#: TYPE NAME SIZE IDENTIFIER
0: GUID_partition_scheme *500.3 GB disk0
1: Apple_APFS_ISC Container disk1 524.3 MB disk0s1
2: Apple_APFS Container disk3 494.4 GB disk0s2
3: Apple_APFS_Recovery Container disk2 5.4 GB disk0s3
/dev/disk3 (synthesized):
#: TYPE NAME SIZE IDENTIFIER
0: APFS Container Scheme - +494.4 GB disk3
Physical Store disk0s2
1: APFS Volume Macintosh HD 12.9 GB disk3s1
2: APFS Snapshot com.apple.os.update-... 12.9 GB disk3s1s1
3: APFS Volume Preboot 9.6 GB disk3s2
4: APFS Volume Recovery 1.6 GB disk3s3
5: APFS Volume Data 360.1 GB disk3s5
6: APFS Volume VM 20.5 KB disk3s6
/dev/disk4 (external, physical):
#: TYPE NAME SIZE IDENTIFIER
0: GUID_partition_scheme *30.8 GB disk4
1: Microsoft Basic Data 5.0 GB disk4s1
2: EFI ESP 5.2 MB disk4s2
3: Microsoft Basic Data 307.2 KB disk4s3将USB unmount(将N替换为挂载路径):
diskutil unmountDisk /dev/<device_name>1
2~ ❯ diskutil unmountDisk /dev/disk4
Unmount of all volumes on disk4 was successful将镜像写入U盘:
sudo dd if="path/to/iso_file" of="/dev/<device_name>" bs=1M status=progress1
sudo dd if="/Users/lyk/Tools/OS Images/ubuntu-22.04.3-desktop-amd64.iso" of="/dev/disk4" bs=1 status=progress
After writing, eject the disk:
1
diskutil eject /dev/disk2
Ventory
Start to use Ventoy
以Windows上使用为例:
- Download the Linux image you want.
- Download Ventory, 得到zip文件.
- 在windows中解压该文件, 执行其中的
Ventoy2Disk.exe. - Insert the USB stick(插入U盘). 安装过程将会清空 U 盘全部内容,请务必提前备份.
- 在软件界面中, 选择你下载的镜像文件的位置和你的U盘, 跟着流程走即可.
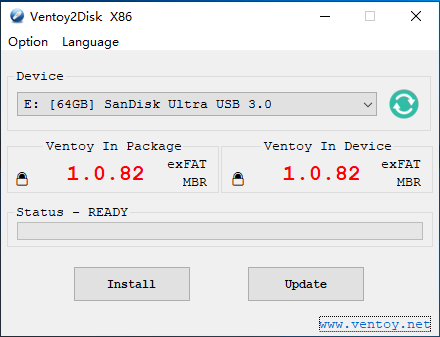
Note: Ventory会把USB stick的文件系统转化为exFAT, 这个格式相比Windows专属的NTFS有个好处, 就是license比较宽松, OSX和Linux都能支持extFat的read & write.
(对照之下, OSX和Linux对NTFS都只能read, 默认没有write的驱动. )
Note: 用Ventory制作的系统盘在启动环节会提供多个boot选项. 一般都选择Normal Mode, Grub2 Mode只适用于少数情况:
The mechanism used by Ventoy need to be supported by the firmware in the motherboard especially in UEFI mode. Normally there is no problem as long as the BIOS firmware of the motherboard meets the standard. Alough the probability is relatively low, there do exist some buggy BIOS firmware that is not standard. In this case, Ventoy may have problems when booting an ISO file.
Attention:
- Use GRUB2 mode only when you run into problem with the default mode.
- GRUB2 mode can only be used to boot Linux ISO which contains grub2 configuration file and can not be used to boot Windows/WinPE/Unix
BalenaEtcher
- Download balenaEtcher.
- Insert the USB stick.
- Open balenaEtcher. Follow its instructions.

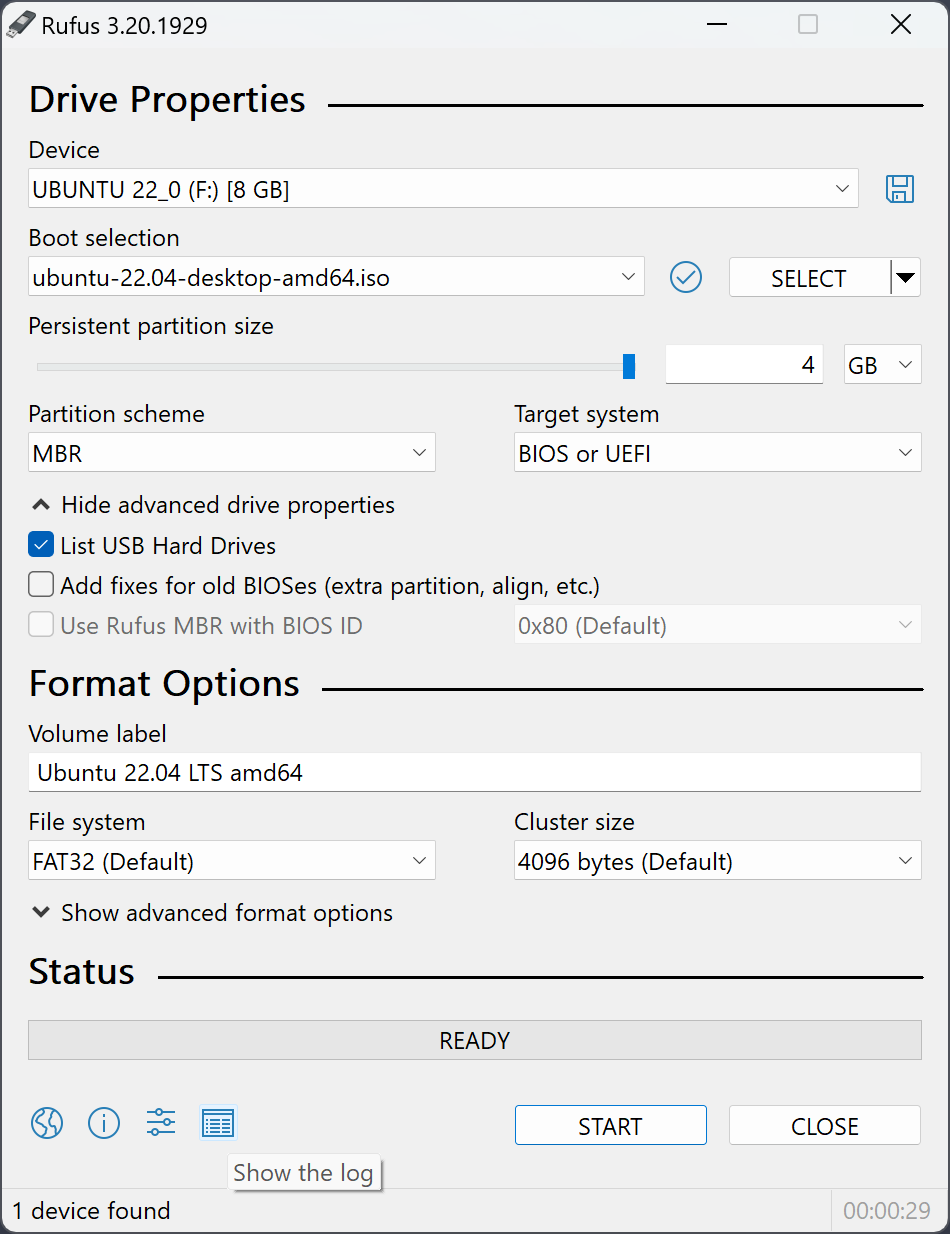
Rufus
Rufus: